Are your family photos and videos falling short of your expectations? Do you struggle to capture those perfect moments that truly reflect the beauty and emotions of your family? Look no further! In this post, we will delve into the powerful technique of the rule of thirds and how it can help you solve your family photography and videography challenges. Get ready to elevate your skills and create stunning visuals that will leave a lasting impression.

Understanding the Rule of Thirds: A Key Solution for Family Photography and Videography

Alright, everyone, get ready to embark on a journey into the incredible power of the rule of thirds. This composition technique is nothing short of magical when it comes to capturing captivating family photos and videos. Consider it your secret ingredient, infusing that extra spice into your visual storytelling endeavors. With a simple division of your frame into thirds, like a playful tic-tac-toe board, you unlock the potential to create visually appealing compositions that engage and mesmerize. Let’s explore how this technique can solve your family photography and videography challenges and elevate your content from average to exceptional! Prepare to be amazed as we delve into the wondrous realm of the rule of thirds.

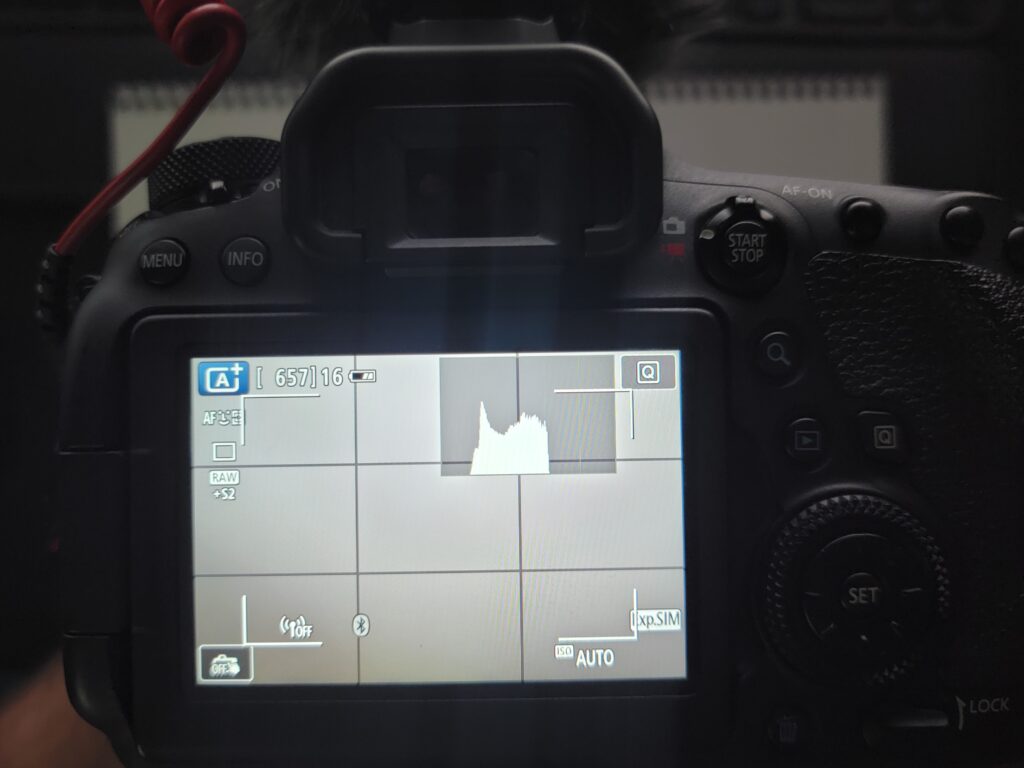
Accessing Grid Lines on Your Device:

This simple yet effective composition technique can be your ultimate solution to capturing captivating family photos and videos. But to make the most of it, you’ll want to enable grid lines on your device. Here’s how to access them:

On a Camera: 

  1. Turn on your camera and navigate to the settings menu.
  2. Locate the option called “Grid Lines” or “Grid Display” and select it.
  3. Choose the desired grid type, such as the rule of thirds or a square grid.
  4. Exit the settings menu and start taking photos or videos. You’ll now have grid lines visible on your camera screen, helping you compose your shots with precision.
Grid Lines showing on Canon 6D Mark II in Live View Mode.
Canon 6D Mark II with grid lines.

On a Smartphone:

  1. Open your camera app and access the settings menu.
  2. Look for an option labeled “Grid Lines” or “Grid Display” and tap on it.
  3. Select the type of grid you prefer, such as the rule of thirds or a square grid.
  4. Exit the settings menu and begin capturing photos or videos. You’ll now have grid lines visible on your smartphone screen, aiding you in achieving well-balanced compositions.
iPhone – Grid Lines

Android – Grid Lines


Remember, the grid lines option’s exact location and naming may vary depending on your camera or smartphone model. If you encounter any difficulties finding it, consult your device’s user manual or conduct a quick online search for specific instructions tailored to your device. With grid lines enabled, you can harness the true potential of the rule of thirds and elevate your family photography and videography to new heights.


Implementing the Rule of Thirds in Family Photography: Techniques to Solve Family Photography Challenges

“Are you tired of dull and uninspiring family photos? The rule of thirds is here to solve your family photography challenges! By understanding and applying this technique, you can capture the essence of special moments and emotions during your family outings. Get ready to enhance your skills and take your family photos to a whole new level!”

Young boy reaching for a toy. Not a composed photo.

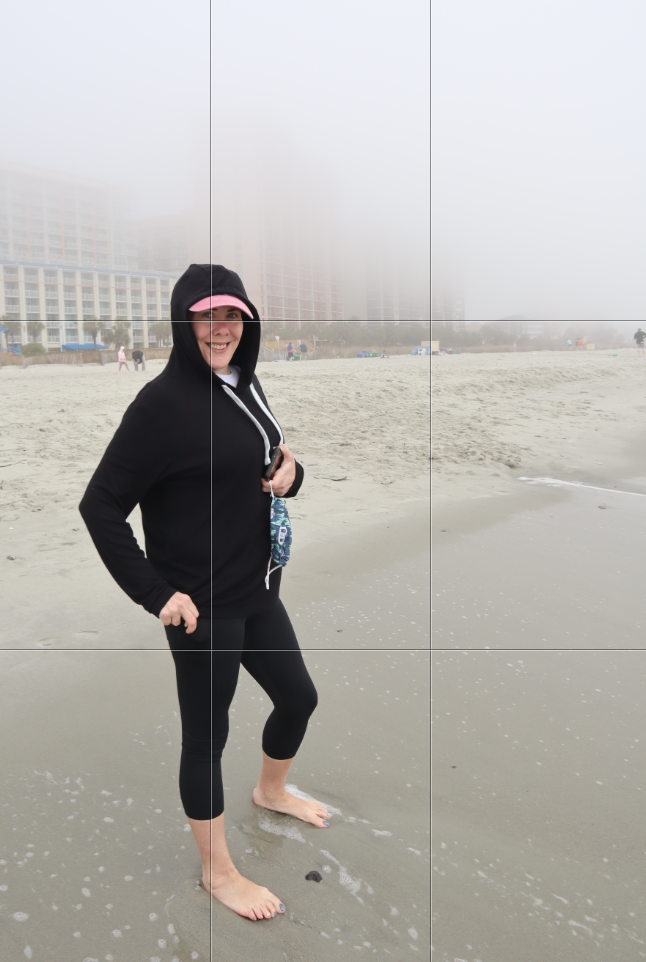
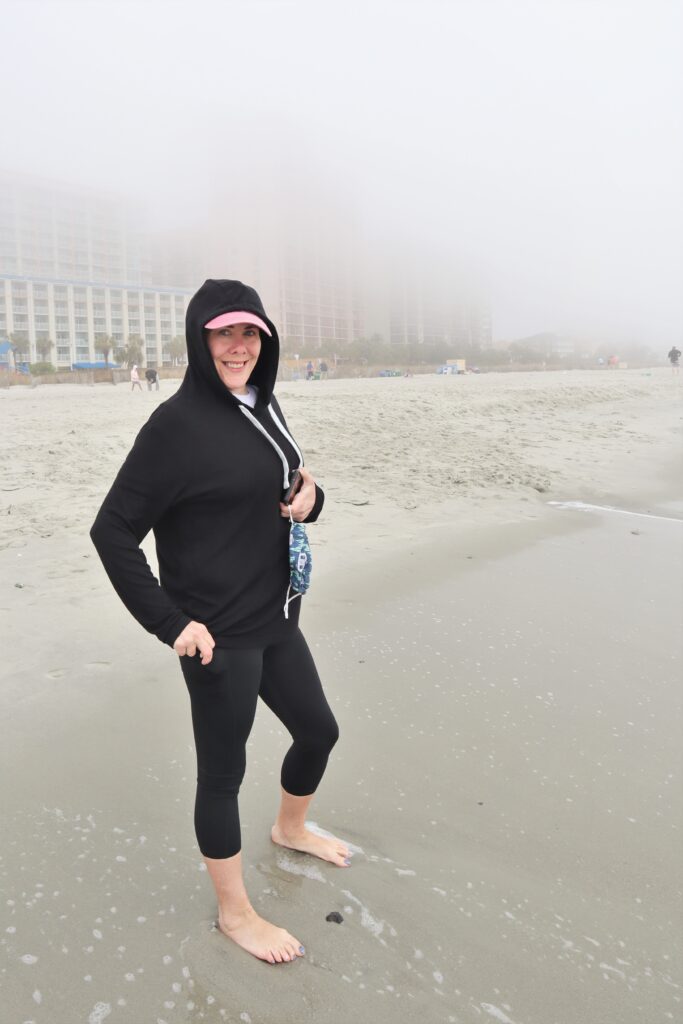
Not Using Rule of Thirds properly.

You boy reaching for a toy. Example of using Rule of Thirds.
Using Rule of Thirds properly.

Woman on a beach wearing a hoodie. Not using ROT properly. Showing Grid Lines.

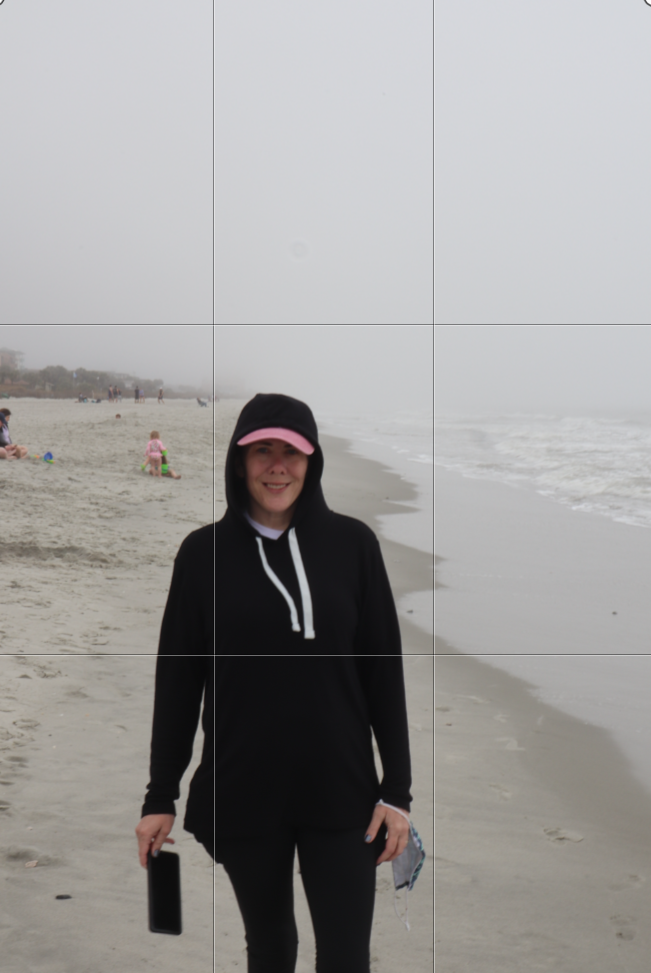
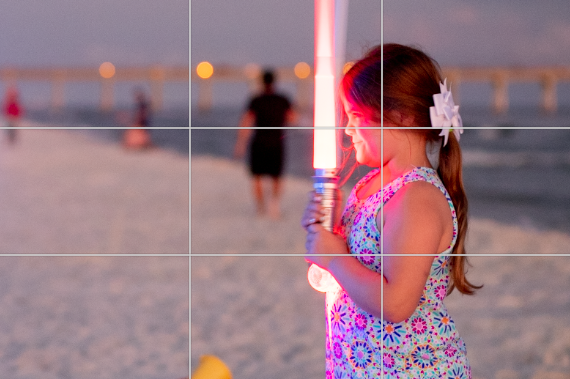
Grid Lines on presented on image. Not composed properly.

Woman on the beach wearing a hoodie. With fog. Posed and showing Grid Lines on photo.
Changed the angle and now using grid lines to compose the photo.
Woman on a foggy beaching wearing a hoodie. Finished photo after applying ROT
Finished photo after applying Rule of Thirds.

Applying the Rule of Thirds in Family Videography: Transforming Your Family Videos

“Do your family videos fail to deliver the impact you’re aiming for?  The rule of thirds is the ultimate solution to your family videography challenges! With this technique, you can turn your videos from bland to breathtaking. In this section, we’ll show you how to leverage the rule of thirds to create more dynamic and engaging family videos that will leave your audience captivated.”


Do’s and Don’ts for Photography and Videography

Do’s:

  1. Do use the rule of thirds to create a balanced and visually pleasing composition.
  2. Do position key subjects or points of interest along the intersecting lines or at the intersection points.
  3. Do experiment with different perspectives, angles, and camera movements to add depth and interest.
  4. Do utilize the grid lines on your device to guide your composition and ensure accurate placement.
  5. Do capture the emotions and interactions between family members by placing them strategically within the frame.
  6. Do consider the lighting conditions and use the rule of thirds to enhance the lighting and create a more captivating visual.
  7. Do practice and refine your skills with the rule of thirds to improve your family photography and videography over time.

Don’ts:

  1. Don’t place your main subject dead center in the frame; aim for a more dynamic and engaging composition.
  2. Don’t overcrowd the frame with too many elements; focus on the key subjects.
  3. Don’t neglect other compositional techniques like leading lines, framing, or symmetry that can complement the rule of thirds.
  4. Don’t limit yourself to using the rule of thirds in every single shot; there are times when breaking it can create unique effects.
  5. Don’t forget to consider the background and ensure it complements your subject rather than distracts from it.
  6. Don’t be afraid to experiment and take multiple shots or video clips from different perspectives to find the most compelling composition.
  7. Don’t overlook the importance of timing and capturing the decisive moment in your family visuals.

By following these guidelines for both family photography and videography, and incorporating the rule of thirds effectively, you’ll be able to create visually captivating and emotionally engaging visuals that truly capture the essence of your family moments.


Rule of Thirds: Your Key to Stunning Family Photos and Videos

If you’re looking to overcome your family photography and videography challenges, mastering the rule of thirds is your answer.

By incorporating this technique into your creative process, you can solve the common struggles of capturing memorable moments and visually compelling content. Don’t hesitate to experiment with different compositions and practice using the rule of thirds during your family outings. With dedication and application, you can create stunning family photos and videos that truly reflect the beauty and emotions of your loved ones. So, embrace the power of the rule of thirds, unleash your creativity, and solve your family photography and videography challenges. Take this opportunity to elevate your skills, create lasting memories, and craft visuals that will leave a lasting impression on your audience. Embrace the rule of thirds, and watch as your family photos and videos transform from ordinary to extraordinary.

Remember, the key is understanding the rule of thirds, practicing implementing it in your compositions, and experimenting with different perspectives and subjects. Whether you’re capturing a candid moment during a family outing or documenting a special milestone, the rule of thirds can be your guiding principle for creating visually compelling and emotionally resonant visuals.

So, grab your camera or smartphone, enable the grid lines, and start incorporating the rule of thirds into your family photography and videography. Solve your challenges, capture breathtaking moments, and create a treasure trove of memories your family will cherish for years.

Recommended Camera Gear and Further Resources

Start your journey to stunning family photos and videos with recommended camera gear:

Elevate your photography game to new heights by using the right equipment. Whether it’s a reliable camera, versatile lenses, or essential accessories like tripods and external flashes, choosing the gear that suits your needs and budget is crucial. As a part of affiliate programs for Amazon, we are required to state that we make a small amount of money when you click on the following links. It costs you nothing, and helps us grow our channel.

Explore more insightful posts and helpful tips on our blog:

  • Make your family photos and videos look AMAZING?: Here

To visually guide you through these techniques and tips, watch our video tutorial: [Video tutorial link]

Don’t miss out on ongoing support, insightful posts, and helpful tips by following our blog. We’re dedicated to helping you enhance your family photography and videography skills.

Capture lasting memories with your family, and thank you for your continuous support!

How YOU can make your family photos and videos look AMAZING!

Introduction.


Family photos and videos are precious keepsakes that help us relive cherished memories and share our stories with future generations. Capturing these moments beautifully requires a combination of composition techniques, creativity, and a keen eye for detail. In this blog post, we’ll explore essential composition techniques and practical tips to help you create stunning family photos and videos look amazing and that you’ll treasure for years to come.


Essential Composition Techniques you can use right now!


1. Rule of Thirds

The Rule of Thirds is a fundamental composition technique that helps create balanced and visually appealing images. To apply this rule, imagine dividing your frame into nine equal parts using two equally spaced horizontal lines and two equally spaced vertical lines. Place your subjects or key elements along these lines or at the intersections to create a more dynamic and engaging composition.

Young girl on the beach holding a light saber and the Rule of Thirds grid as on overlay. One of the technique for how to make your family photos and videos look AMAZING

Scientific studies have gone into this stating that points at which the lines cross are points in which the human eye is drawn. There is a little more to learn about this technique but to help you understand this quickly, think about it this way. If your child’s body is turned to her left. Then position the view so that it looks as if they are looking across the open area. And put their face in the upper left or right cross point.

Young girl on the beach holding a light saber and without the Rule of Thirds grid as finished photo. One of the technique for how to make your family photos and videos look AMAZING

2. Leading Lines

Leading lines are lines within your image that guide the viewer’s eye towards your main subject. These lines can be natural, like a path or a river, or man-made, like a fence or a row of trees. By incorporating leading lines into your family photos and videos, you can create a sense of depth and direct the viewer’s attention to your subjects.

Family at the zoo looking at an animal exhibit. This photo is an example of using leading lines. One of the technique for how to make your family photos and videos look AMAZING.

Man leaning again a wall with state capitol in the background. This photo is an example of using leading lines. One of the technique for how to make your family photos and videos look AMAZING.

3. Framing


Framing involves using elements within your scene to create a frame around your subject. This can be achieved using natural elements like trees, doorways, or windows, or by incorporating props like picture frames or mirrors. Framing helps draw attention to your subject and adds visual interest to your composition.

Man standing on a pathway in a park with trees and pathway as frame. This photo is an example of framing in a picture using environmental elements. One of the technique for how to make your family photos and videos look AMAZING.

Photo of a sloth hanging upside down from a rope. The sloth is framed by foliage. This photo is an example of framing in a picture using environmental elements. One of the technique for how to make your family photos and videos look AMAZING.


Practical Tips to make your family photos and videos look AMAZING!

1. Capture Candid Moments

Candid moments often make the most memorable family photos and videos. Keep your camera ready to capture genuine emotions and interactions between family members. These unposed, spontaneous shots will bring your family’s story to life.

Photo of a woman standing in the ocean drinking coffee early in the morning. This an example of taking a candid photo using composition techniques. This is part of the How to make your family photos and videos look AMAZING blog post.

Black and white photo of a father and daughter walking away from the camera on the beach looking at the ocean. This an example of taking a candid photo using composition techniques. This is part of the How to make your family photos and videos look AMAZING blog post.


2. Pay Attention to Lighting

Lighting plays a crucial role in creating beautiful images and videos. Natural light is your best friend, so try to shoot outdoors or near windows when possible. If you’re shooting indoors, avoid harsh overhead lights and use soft, diffused light sources instead.

Man and woman, husband and wife, walking on the beach away from the camera at sunset as if walking into the sun. This is an example a candid photo that uses the direct sun to for lighting. This is part of the How to make your family photos and videos look AMAZING blog post.

Photo of a woman standing in trees with the sun shining overhead. She is also framed with the branches of the tree. This is part of the How to make your family photos and videos look AMAZING blog post.


3. Get Creative with Angles

Experiment with different angles to add variety and interest to your family photos and videos. Shoot from above, below, or at eye level with your subjects. Don’t be afraid to get down on the ground or climb up on something to find the perfect angle.

This a photo of a young boy playing with sidewalk chalk in a driveway. This is an example of a candid photo using Rule of Thirds and changing angles.

4. Include Props and Activities

Incorporating props and activities into your family photos and videos can add an extra layer of storytelling and make your images more engaging. Use items that have sentimental value or represent your family’s interests, like a favorite toy, a cherished book, or a musical instrument. Plan activities that your family enjoys, such as baking cookies, playing board games, or having a picnic, and capture these moments as they unfold.

Photo of woman and teen with toddlers playing with sidewalk chalk. This is an example using props and activities in photos.

Photo of a man and young boy playing a board game. This is an example using props and activities in photos.

Conclusion.

We hope you found these composition tips helpful in your journey to capturing beautiful family moments. To further enhance your photography and videography skills, we recommend investing in quality camera gear. As a part of affiliate programs for Amazon, we are required to state that we make a small amount of money when you click on the following links. It costs you nothing, and helps us grow our channel.

Recommended camera gear for stunning family photos:

By using the right equipment, such as a reliable camera, versatile lenses, and essential accessories like tripods and external flashes, you can elevate your photography game to new heights. Remember, the gear you choose should align with your specific needs and budget.

Also, make sure to check out our recent blog post on Mother’s Day gift ideas. Now that you’ve learned how to make your family photos amazing, it’s a great opportunity to create personalized gifts that capture beautiful memories. Find inspiration and thoughtful gift ideas in our Mother’s Day blog post.

Don’t forget to follow our blog for more insightful posts and helpful tips to further enhance your family photography and videography skills. We’re here to support you on your photography journey.

Don’t forget to check out our video tutorial on How YOU Can Make YOUR Family Photos and Videos Look AMAZING for a visual guide to these techniques and tips.

Happy shooting, and may your family photos and videos be cherished for generations to come! Thank you for your support!

The Challenge of Finding a Meaningful Mother’s Day Gift: A Solution for Preserving Memories Digitally

Introduction:

Finding the perfect Mother’s Day gift is challenging. We all want to convey our love and appreciation in a way that touches our mothers’ hearts. Traditional gifts often fall short. That’s where the problem lies. But fear not! In this article, we explore the problem of finding a meaningful Mother’s Day gift and present a solution: preserving memories digitally through a personalized photo album. Discover how this innovative approach helps you create a memorable experience for your mother.

The Problem: The Search for a Meaningful Mother’s Day Gift

Every year, Mother’s Day approaches, and we embark on a quest to find that special gift. We want something that tells a unique story, captures cherished memories, and conveys our deep emotions. Traditional options lack the personal touch and fail to create a lasting impression.

The Solution: Preserving Memories Digitally with a Personalized Photo Album

Imagine the joy on your mother’s face as she flips through a personalized photo album. Each page brings forth a flood of emotions, as cherished memories come to life. Preserving memories digitally through a customized photo album is the perfect solution. It allows you to curate heartfelt photos that beautifully narrate your unique story, creating a seamless flow of emotions.

Digitizing Old Photos: Embracing the Past, Enriching the Present

box of old photos. 
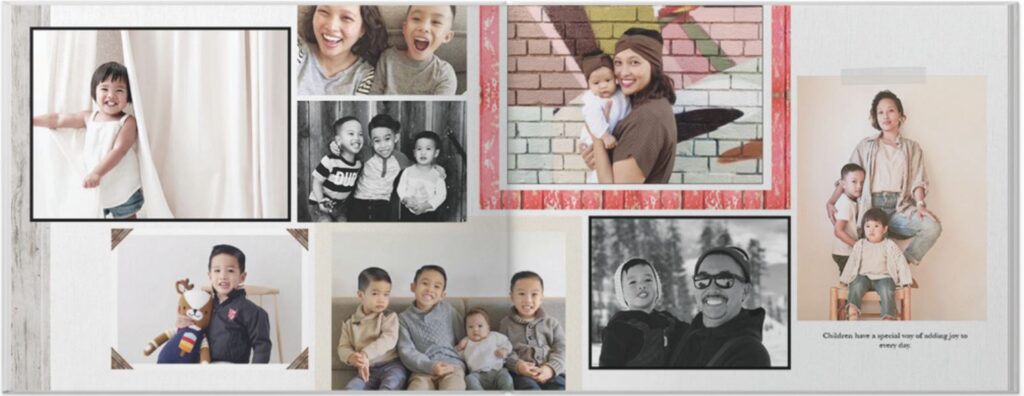
To make your personalized photo album more meaningful, it’s essential to digitize your collection of old printed photos. We have another post that goes into more detail about the digitization process for videos. You can find it here. Many of us tuck away cherished family photos, eagerly waiting to rediscover them. By digitizing these prints, you breathe new life into them and ensure they become an integral part of your gift. Utilize a scanner or your smartphone camera to transform these physical memories into high-quality digital images, preserving the nostalgia and sentimentality they hold.

For those looking for a reliable scanner option, the Epson Perfection V550 scanner is highly recommended. This scanner offers high-quality scans, ensuring that your old printed photos are accurately transformed into digital images. Preserving the integrity and details of each cherished photograph becomes effortless with this reliable scanner.

Creating a Customized Photo Book: Crafting a Lasting Tribute

Open Photo Book of family photos from Shutterfly.com
Open Photobook of family photos from shutterfly.com

With your digitized photo collection ready, create a customized photo book that touches your mother’s heart using Shutterfly’s intuitive platform. shutterfly.com  Their user-friendly tools will help bring your vision to life. Easily upload digital photos, including the digitized versions of old prints. Explore pre-made templates tailored for Mother’s Day or your desired theme. Customize your album with personalized captions, heartfelt messages, and unique layouts and backgrounds.”


Conclusion:

Finding a meaningful Mother’s Day gift is surmountable. Preserve memories digitally, curate a personalized photo album, and give your mother a gift that truly speaks to your love and appreciation. This heartfelt gift extends beyond a single occasion and becomes a keepsake that celebrates your bond. Embrace the opportunity to create something extraordinary. Start crafting your personalized photo album today and celebrate the special women in your life in an unforgettable way. Let them know their love and care are etched in your heart forever. You can even watch the video below to explore more gift ideas for mom.


Notes:

I’m required to state that I’m a part of affiliate programs for Amazon and Kit, which means that I make a small amount of money when you click on those links in my video descriptions. It costs you nothing, and helps me grow my business. Thank you for your support!

[fusion_builder_container type=”flex” hundred_percent=”no” equal_height_columns=”no” hide_on_mobile=”small-visibility,medium-visibility,large-visibility” background_position=”center center” background_repeat=”no-repeat” fade=”no” background_parallax=”none” parallax_speed=”0.3″ video_aspect_ratio=”16:9″ video_loop=”yes” video_mute=”yes” border_style=”solid”][fusion_builder_row][fusion_builder_column type=”1_1″ type=”1_1″ background_position=”left top” border_style=”solid” border_position=”all” spacing=”yes” background_repeat=”no-repeat” margin_top=”0px” margin_bottom=”0px” animation_speed=”0.3″ animation_direction=”left” hide_on_mobile=”small-visibility,medium-visibility,large-visibility” center_content=”no” last=”no” hover_type=”none” min_height=”” link=””][fusion_text]

Storing Your Photos and Videos.

Do the following statements sound familiar?

“Where did I save those pictures of the birthday party?” or  “Help! My computer has crashed, and I can’t get to my pictures and files!” 

How do you go about storing your photos and videos? Do you have documents, music, and pictures stored in and on random USB flash drives, memory cards, and disks? When you are wanting to use them, you are scrambling to find them and searching through all of your devices to find what you are looking for. What is your plan for storing your photos and videos? 

The Assessment:

Do you need the 3 step plan for storing your photos and videos? Let me answer for you. Yes, you do. But if you are still wondering, then let’s take a quiz.

Do you have photos (printed or digital) and videos (tapes or digital) of you and your family from past to present?

Are there photo prints and tapes stored in a box/drawer in the closet/attic/basement? How about those digital ones?

Are they sporadically stored on your computer, phone, or camera cards? You may be one that purchased a USB drive but is it being put to good use?

Do you have a plan in place if something were to happen to them?


Did you answer yes to all of the above? Great! Even the last one? No? Then you do need the 3 step plan for storing your photos and videos?

The Steps:

I will share with you the 3 step plan for storing your photos and videos right now.

Yes, here they are!


Step 1

Gather, Give Structure


Step2

Back-up


Step 3

Make them safe

Sounds simple, right?  Well, basically it is that simple.

Then why do you need to attend a workshop on how to do this?  Ah, now that is the right question.

Why the Plan?:

If you were to follow just these three steps without a plan would you be able to share those pictures to friends and family quickly? Can you ensure that you aren’t missing photos or videos on a regular backup? Can you make sure that they are safe from harm?

I have witnessed the heartbreak over many years of helping so many people try and recover lost photos on their computers. Also I have listened to others be disappointed at wishing that they had converted those videos after a disaster.

What if you could have your photos and videos ready to be shared in an organized way to those you want to share them? And also keep them safe? This is why you will want to attend the storing your memories workshop and learn the 3 step plan for storing your photos and videos!

If you are ready then let’s get started!

Storing Your Memories Workshop


[/fusion_text][/fusion_builder_column][/fusion_builder_row][/fusion_builder_container]

[fusion_builder_container type=”flex” hundred_percent=”no” equal_height_columns=”no” hide_on_mobile=”small-visibility,medium-visibility,large-visibility” background_position=”center center” background_repeat=”no-repeat” fade=”no” background_parallax=”none” parallax_speed=”0.3″ video_aspect_ratio=”16:9″ video_loop=”yes” video_mute=”yes” border_style=”solid”][fusion_builder_row][fusion_builder_column type=”1_1″ align_self=”auto” content_layout=”column” align_content=”flex-start” valign_content=”flex-start” content_wrap=”wrap” center_content=”no” column_tag=”div” target=”_self” hide_on_mobile=”small-visibility,medium-visibility,large-visibility” sticky_display=”normal,sticky” type_medium=”” type_small=”” type=”1_1″ order_medium=”0″ order_small=”0″ dimension_spacing_medium=”” dimension_spacing_small=”” dimension_spacing=”” dimension_margin_medium=”” dimension_margin_small=”” dimension_margin=”” padding_medium=”” padding_small=”” padding=”” hover_type=”none” border_sizes=”” border_style=”solid” border_radius=”” box_shadow=”no” dimension_box_shadow=”” box_shadow_blur=”0″ box_shadow_spread=”0″ z_index_subgroup=”regular” background_type=”single” gradient_start_color=”” gradient_end_color=”” gradient_start_position=”0″ gradient_end_position=”100″ gradient_type=”linear” radial_direction=”center center” linear_angle=”180″ lazy_load=”avada” background_position=”left top” background_repeat=”no-repeat” background_blend_mode=”none” render_logics=”” sticky=”off” sticky_devices=”small-visibility,medium-visibility,large-visibility” absolute=”off” absolute_props=”” filter_type=”regular” filter_hover_element=”self” filter_hue=”0″ filter_saturation=”100″ filter_brightness=”100″ filter_contrast=”100″ filter_invert=”0″ filter_sepia=”0″ filter_opacity=”100″ filter_blur=”0″ filter_hue_hover=”0″ filter_saturation_hover=”100″ filter_brightness_hover=”100″ filter_contrast_hover=”100″ filter_invert_hover=”0″ filter_sepia_hover=”0″ filter_opacity_hover=”100″ filter_blur_hover=”0″ transform_type=”regular” transform_hover_element=”self” transform_scale_x=”1″ transform_scale_y=”1″ transform_translate_x=”0″ transform_translate_y=”0″ transform_rotate=”0″ transform_skew_x=”0″ transform_skew_y=”0″ transform_scale_x_hover=”1″ transform_scale_y_hover=”1″ transform_translate_x_hover=”0″ transform_translate_y_hover=”0″ transform_rotate_hover=”0″ transform_skew_x_hover=”0″ transform_skew_y_hover=”0″ transform_origin=”” transition_duration=”300″ transition_easing=”ease” transition_custom_easing=”” animation_direction=”left” animation_color=”” animation_speed=”0.3″ animation_delay=”0″ min_height=”” last=”no” link=”” border_position=”all”][fusion_youtube autoplay=”false” hide_on_mobile=”small-visibility,medium-visibility,large-visibility” structured_data=”off” video_upload_date=”” video_duration=”” video_title=”” video_desc=”” id=”https://youtu.be/gGODcU8-znU” alignment=”center” /][/fusion_builder_column][fusion_builder_column type=”1_1″ type=”1_1″ background_position=”left top” border_style=”solid” border_position=”all” spacing=”yes” background_repeat=”no-repeat” margin_top=”0px” margin_bottom=”0px” animation_speed=”0.3″ animation_direction=”left” hide_on_mobile=”small-visibility,medium-visibility,large-visibility” center_content=”no” last=”no” hover_type=”none” min_height=”” link=””][fusion_text]

Do you want to make better videos that are fun to watch for family and friends? I am talking about videos that are sharable on social media to get likes, high fives and “that is so cute!” and “that looked so much fun, I want to do that!” Then hang tight and we are going to walk through some simple steps to make your videos stand out no matter where you show them. Here are 3 Tips for Shooting Better Videos!

Hey there, my name is Evan and this blog is all about “Helping you capture, create, and share your memories.” So let’s get right to it.

Are you one of those people that wants to record every minute of your family’s activities? I am that person. But the problem we have is that sometimes we have hours of video on our camera and they just end up staying on the memory card, copied to the computer and left alone, or GASP!, deleted and never to be seen again! Don’t do that!

Or are you one to not record because you are afraid of how the videos will turn out? Don’t be that person either!

Whether you are always recording or never recording, I am here to help you get the confidence to not only capture but to also make them fun to capture. And bring smiles to those who watch them.

I have 3 Tips for Shooting Better Videos that you can do right now to help you make your videos stand out and are fun to watch. Keep reading to get a bonus tip that will get high fives from your family and friends, or statements like, “that was so cute!” or “I want to do that with my family.”

Pro Tip – Record with intention of capturing the activity. Don’t just turn the camera to record and leave it on to capture the whole 4 hours of playing in the yard. Pick parts of the activity to capture and move along. This will save in piecing it all together later.

How about that! A pro tip and we haven’t even gotten started yet.

Tip #1. – CHANGING YOUR PERSPECTIVE

Changing the perspective will make a lot of difference. By adjusting just a few minor views with your camera you will see how the video changes for the better. Let’s look at a couple of options.

Decide on different angles or perspectives you would like to or can capture. This could also depend on Tip #2 which we will get to in a minute. Different angles could mean viewing from outside in, viewing from eye level, or right smack in the middle.

In the still above you can see that everyone is in the view. So this would be eye level but from a third person perspective.

Another angle or perspective would be you or someone holding the camera and being in the middle of the action. Such as this one. We were at a zoo and trying to jump as far as a kangaroo and I was jumping with the camera to be a part of the action.

Or give the camera to another person and get into the action (like when I played freeze tag with in the yard with our niece and nephew. The point here is to make sure you are not always behind lens but part of the memory for everyone.

Don’t feel stuck to only capture from one perspective the during the activity. Mix it up and use all the angles and points of view. Just don’t make yourself or the viewer dizzy when watching.

On to Step #2 which is

Tip #2 – LIGHTING

When it comes to lighting it is important that the camera has enough light to capture the action. There are two basic lighting sources. Natural light and Artificial light. Hopefully the differences are self-explanatory. When capturing your family it is always best to have the light source behind or off to the side of the camera pointing toward what you are capturing. Pay attention to how the light is on your “subject”, your family when recording them.

  • Natural lighting. Cloudy days are great for not casting shadows downward on to faces. Sunny days are good as well, just make sure there aren’t harsh shadows. It is fun to capture the children catching fireflies just before dark just make sure your camera sensor can adjust to low light.
  • Artificial lighting. If you are inside, make sure there is enough light for the camera to see the action. And the same ideas applies to lighting your subject’s faces.

If you aren’t able to control the direction of the light, then got back to step #1 and use angles and points of view. Notice that just moving the camera angle where the sun is behind her, but also not completely hidden you can get a lightened face and beautiful sun rise on the beach?

I hope this information is being helpful to you. We are about to look at step #3, but remember we also have a bonus tip coming up after that. Ok, now for step #3.

Tip #3 – AUDIO

You want to make sure that you have a good, clean audio recording of your fun activity. Your camera audio is mostly ok, but there are microphones that can be connected to your camera or phone to help with capturing voices. Depending on the activity or environment, you may have to get the camera and/or microphone close to the person if possible.

But this step about audio is not only about someone’s voice. It is also about enhancing your video with narrations, music and sounds.

Narrations, the idea of describing the activity to your viewer after it had happened. Think read along books, or documentaries.

Adding music to the background is a great idea, if done correctly, will actually help the viewer feel more connected. Be careful when adding music to your videos that you will share online. Some social media platforms will not allow copyright music to used and will mute the audio from the video or not let you post it at all. So choose from a source that allows you to license the music to your video.

Ok so we have gone over 3 Tips for Shooting Better Videos. These include adjustments and techniques that will make capturing videos of your family more fun. I promised you a bonus tip and after the bonus tip we have a challenge so stay with me.

BONUS TIP – TELLING A STORY

Use the technique of Storytelling when capturing your fun. I am referring to the idea of using a story arc.

  • Story Arc
    • The “Who” “What” “Where” “When”
    • Conflict to keep end result from happening.
    • Decision to keep going or change direction.
    • Resolution to finish activity
    • Emotional ending (satisfied, happy, joyful)

Let me explain how it works in normal a situation. You want to make pancakes. You gather ingredients. Realize you need milk. You then have to go get milk or their won’t be any pancakes. Got your milk, now mixing can resume. Then you realize that when you left to go get milk you cautiously turned off stove top (Good thinking!), but didn’t turn it back on. Now skillet is not hot. Now you wait. Once skillet it hot, you pour the mix out on to the skillet. The phone rings and you burn the first batch because of the distraction. At this point you could just eat cereal, but you wanted pancakes. So instead you pour again and stay focused until the first golden goodness is now ready to be plated and have butter and syrup added. The first bite is delicious! You are now happy that you pushed through and finished despite the set-backs.

This technique can be used in almost any activity that you want to record. Think about how events leading up to the activity could be used. Then the activity and then the resolution of getting through the activity. Then the satisfaction by all involved. Even condensed versions of the story arc can be used in 30 second clips. By using it, the viewer will stay engaged longer and feel satisfied after watching. Thus giving you the high fives, likes and “that is so fun, I want to do that!” In return you have made a memory to cherish forever and one that is worthy of watching over and over.

Challenge

And now for the challenge. Find a fun activity for your family to do. It could be going to the park, it could be playing football in the yard, it could be just as simple as watching a movie or playing a board game. Take out your camera or phone, and apply the 3 Tips for Shooting Better Videos that we have talked about today and see how much better just capturing the fun will be. This will get you wanting to do more activities together, recording them and even better, sharing them.

The purpose of this post and many others to come is to give you the confidence, the tips, and the desire to go out and capture as many memories as you can and create your own stories worthy of sharing.

With Much Thanks!

Thank you for following along as we talked about 3 Tips for Shooting Better Videos. I hope that this post was informative and useful.

**************************************************************

Do you have a cameras and other gear that you use to capture family activities? Then this website is for you. We show how to use your cameras with video tutorials giving you tips and tricks on how record your family. All for the purpose of saving and reliving those memories forever.

**************************************************************

I’m required to state that I’m a part of affiliate programs for Amazon, which means that I make a small amount of money when you click on those links in my video descriptions. It costs you nothing, and helps me grow my business. Thank you for your support!

Links to gear in this post:

Canon EOS M50 Mark II

GoPro Action Camera

Rode VideoMicro

[/fusion_text][/fusion_builder_column][/fusion_builder_row][/fusion_builder_container]